![]()
![]()
![]()
3.
A Small Configuration Example
![]()
3.1 Configuration File Setup
Make sure that the config files already discussed are properly setup, this should be done for each machine. It is possible to run multiple agents on one machine, in that case the RMI registry would only need to be started once.
The configuration file located here will be used as an example. A discussion of how to change this file for your own use follows.
The file begins with the setting of the system values. You should substitute your installation path for /project/space03/konark/konarkjtucker. The SYSLOG_FILE is the file that the monitoring environment will look to for information about system logs. The items with the postfix _FILE are default configuration files. They can be updated depending on your needs.
SYSTEM_VALUE{
  DEFAULT_HANDLER = network.manager.DefaultEventHandler;
  TIMER_FREQ = 20000;
  CPU_TIMER_FREQ = 60000;
  SYSLOG_FILE = /var/adm/messages;
  IPE_FILE = /project/space03/konark/konarkjtucker/network/config/ipepolicyfile;
  ARM_ARGS_FILE = /project/space03/konark/konarkjtucker/network/config/armargs;
  DAEMONS_FILE = /project/space03/konark/konarkjtucker/network/config/daemons;
  PATTERN_FILE = /project/space03/konark/konarkjtucker/network/config/SyslogPatterns;
  DOMAIN_HOSTS_FILE = /project/space03/konark/konarkjtucker/network/config/hosts;
  MONITORUSERS_FILE = /project/space03/konark/konarkjtucker/network/config/logUsers;
  ROOTLOGIN_HOSTS_FILE = /project/space03/konark/konarkjtucker/network/config/roothosts;
  VALID_USERS_FILE = /project/space03/konark/konarkjtucker/network/config/validUsers;
  DISK_USAGE_FILE = /project/space03/konark/konarkjtucker/network/config/diskUsageThresholds;
}
The example configuration then lists the default subscriber. The defaultSubscripers URN should be listed first. The AGENT_NAME is the name of the agent according to the ~/.ajanta/servers folder (i.e. In the .ajanta/servers folder there should be a directory named defaultSubscriber. See the ajanta guide for how to add servers.). The name of the agent “defaultSubscriber” is for convince. The name could be different if you so wish. The dburl is the url of the database that you will be using for network monitoring. The dbuser is the user name for the database, and similarly the dbpasswd is the password for the dbuser to the database. The default subscriber needs to be included in any configuration.
DEFAULT_SUBSCRIBER{
  TARGET_HOST = URN:ans:plato.cs.umn.edu/jtucker/defaultSubscriber;
  AGENT_NAME = ~/defaultSubscriber;
  dburl = jdbc:mysql://archimedes.cs.umn.edu:10000/test;
  dbuser = mobile_agent;
  dbpasswd = user1000;
  DETECTOR{
  }
}
The example configuration then goes on to give three agents. All of the agents have the same form so only one will be covered here. The TARGET_HOST should be set to the agent server's URN. The AGENT_NAME corresponds to a directory in ~/.ajanta/servers/. The dburl, dbuser, and dbpasswd are all dependent on the events database that you are using for network monitoring. The trigger table is the absolute location of the trigger file that was discussed in 2.1. The DETECTOR{} section lists the detectors that should be included in this agent. Along with the detectors an event handler is specified. In this case the only handler is the EventHandler, there will be examples of others later on.
AGENT{
  TARGET_HOST = URN:ans:plato.cs.umn.edu/jtucker/plato.cs.umn.edu;
  AGENT_NAME = ~/plato;
  dburl = jdbc:mysql://archimedes.cs.umn.edu:10000/test;
  dbuser = mobile_agent;
  dbpasswd = user1000;
  TRIGGER_TABLE = /home/ugrad00/jtucker/konark/trigger;
  DETECTOR{
        network.detectors.TimerEventDetector, network.manager.EventHandler;
        network.detectors.SyslogEventDetector, network.manager.EventHandler, "restart";
        network.detectors.MarkFailEventDetector, network.manager.EventHandler;
        network.detectors.SUEventDetector, network.manager.EventHandler;
        network.detectors.TelnetEventDetector, network.manager.EventHandler;
        network.detectors.FtpEventDetector, network.manager.EventHandler;
        network.detectors.SshSftpEventDetector, network.manager.EventHandler;
        network.detectors.RSHEventDetector, network.manager.EventHandler;
        network.detectors.RLoginEventDetector, network.manager.EventHandler;
        network.detectors.XDMEventDetector, network.manager.EventHandler;
        network.detectors.LoginEventDetector, network.manager.EventHandler;
        network.detectors.LogoutEventDetector, network.manager.EventHandler;
        network.detectors.FileSystemFullEventDetector, network.manager.EventHandler;
        network.detectors.OutsideDomainLoginEventDetector, network.manager.EventHandler;
        network.detectors.AbnormalRootLoginEventDetector, network.manager.EventHandler;
        network.detectors.AgentAliveEventDetector, network.manager.EventHandler;

        network.detectors.CPUTimerEventDetector, network.manager.EventHandler;
        network.detectors.ProcessMonitoringEventDetector, network.manager.EventHandler;
        network.detectors.NewProcessEventDetector, network.manager.EventHandler;
        network.detectors.NewRootProcessEventDetector, network.manager.EventHandler;
        network.detectors.IPEEventDetector, network.manager.EventHandler;
        network.detectors.DeletedProcessEventDetector, network.manager.EventHandler;
        network.detectors.DaemonDeletedEventDetector, network.manager.EventHandler;
        network.detectors.RunawayProcessEventDetector, network.manager.EventHandler;
        network.detectors.UserSwitchAttemptEventDetector, network.manager.EventHandler;

        network.detectors.MultipleAccountSwitchEventDetector, network.manager.EventHandler;
        network.detectors.MultipleLoginFailureFromSameLocationEventDetector, network.manager.EventHandler;
        network.detectors.MultipleUserLoginFailureEventDetector, network.manager.EventHandler;
        network.detectors.RemoteLoginEventDetector, network.manager.RemoteEventHandler;
        network.detectors.RemoteUserSwitchEventDetector, network.manager.RemoteEventHandler;
        network.detectors.UserSwitchToRootEventDetector, network.manager.EventHandler;
        network.detectors.UserSwitchConfirmEventDetector, network.manager.EventHandler;
        network.detectors.UserSwitchToKonark1EventDetector, network.manager.EventHandler;
  }
}
The final entry into the example configuration file is the database logger. This agent subscribes to the other agents and inserts their events into the database. The TARGET_HOST, AGENT_NAME, dburl, dbuser, dbpasswd, and TRIGGER_TABLE are similarly set as above. This agent's purpose is to subscribe to the other agents in the system. The subscription includes an AGENT_NAME and a list of events that we wish to subscribe to from that agent. This section also demonstrates the ability to include a list. The example INCLUDE file can be seen here. The INCLUDE variable is expanded when this file is parsed to be the contents of the file given as INCLUDE's rvalue. In this section we see an example of a new type of handler, a DatabaseEventHandler. This handler inserts its events into the database.
AGENT{
        TARGET_HOST = URN:ans:plato.cs.umn.edu/jtucker/dbLogger;
        AGENT_NAME = ~/dbLogger;
        dburl = jdbc:mysql://archimedes.cs.umn.edu:10000/test;
        dbuser = mobile_agent;
        dbpasswd = user1000;
        TRIGGER_TABLE = /home/ugrad00/jtucker/konark/trigger;
        SUBSCRIPTION{

                AGENT_NAME = ~/plato;
                INCLUDE = /home/ugrad00/jtucker/konark/subscriberInclude

                AGENT_NAME = ~/deca;
                INCLUDE = /home/ugrad00/jtucker/konark/subscriberInclude

                AGENT_NAME = ~/socrates;
                EVENT{
                        network.events.AbnormalRootLoginEvent, network.manager.DatabaseEventHandler;
                        network.events.DaemonDeletedEvent, network.manager.DatabaseEventHandler;
                        network.events.FileSystemFullEvent, network.manager.DatabaseEventHandler;
                        network.events.IPEEvent, network.manager.DatabaseEventHandler;
                        network.events.LoginEvent, network.manager.DatabaseEventHandler;
                        network.events.LogoutEvent, network.manager.DatabaseEventHandler;
                        network.events.MarkFailEvent, network.manager.DatabaseEventHandler;
                        network.events.NewRootProcessEvent, network.manager.DatabaseEventHandler;
                        network.events.OutsideDomainLoginEvent, network.manager.DatabaseEventHandler;
                        network.events.RunawayProcessEvent, network.manager.DatabaseEventHandler;
                        network.events.SUEvent, network.manager.DatabaseEventHandler;
                }
        }
}
You should now go through the example configuration file and change the relevant values to your own.
![]()
3.2 Starting the RMI Registry and Running the SMS Agent Servers
To start the RMI registry execute the following command (the RMI registry should only be started once per machine):
${AJANTA_HOME}/setup/startRMIAfter the RMI registry is started the SMS Agent Servers need to be started. This is done with the following command:
java network.manger.SMSAgentServer name_of_server
A server should be started for each entry in the example configuration and one more for the server that we will use as the SMS Agent Server.
To start the default subscriber:
java network.manager.SMSAgentServer defaultSubscriber
To start the database logger:
java network.manager.SMSAgentServer dbLogger
To start the rest of the servers:
java network.manager.SMSAgentServer dns_hostnameAt this point there should be agent servers for each of the agents specified in the example configuration. There should also be one more for the SMS Agent Server.
After you have launched the server that you wish to use as the SMS server, the file smsgui.conf should be edited to contain the SMS Agent Server URL for convince. The URL can be found when you start the SMS server. It will look like the following http://socrates.cs.umn.edu:20000/URN:ans:plato.cs.umn.edu/jtucker/socrates.cs.umn.edu . Everything except http: should be put in the smsgui.conf file. An example of the smsgui.conf file can be seen in section 2.3.
Note: You may need to ssh into the machines remotely to launch all of the agent servers (unless you choose to run them all on one machine).
![]()
3.3 Setting up the Database
The database is used to log events. You should have your database admin set up a mysql database for you. A database will be needed to log events. The detectors/events automatically will create their own tables.
The following command will start the database:
nohup ./bin/mysqld --basedir=$sqlpath/ --port=port_num --datadir=$sqlpath/konark --pid-file=$sqlpath/konark/$HOST.pid&
The SMS Agent Configuration file should reflect the machine's dns name where you started the database and the port you started it on.
![]()
3.4 Using the GUI
Now the gui should be started. Execute:
java network.gui.SMSGUI port_num
where port-num is the port number of the SMS server.
The gui should begin.
Go to the SMS menu and click on Launch SMS Agent.
Doing this will bring up a dialog.
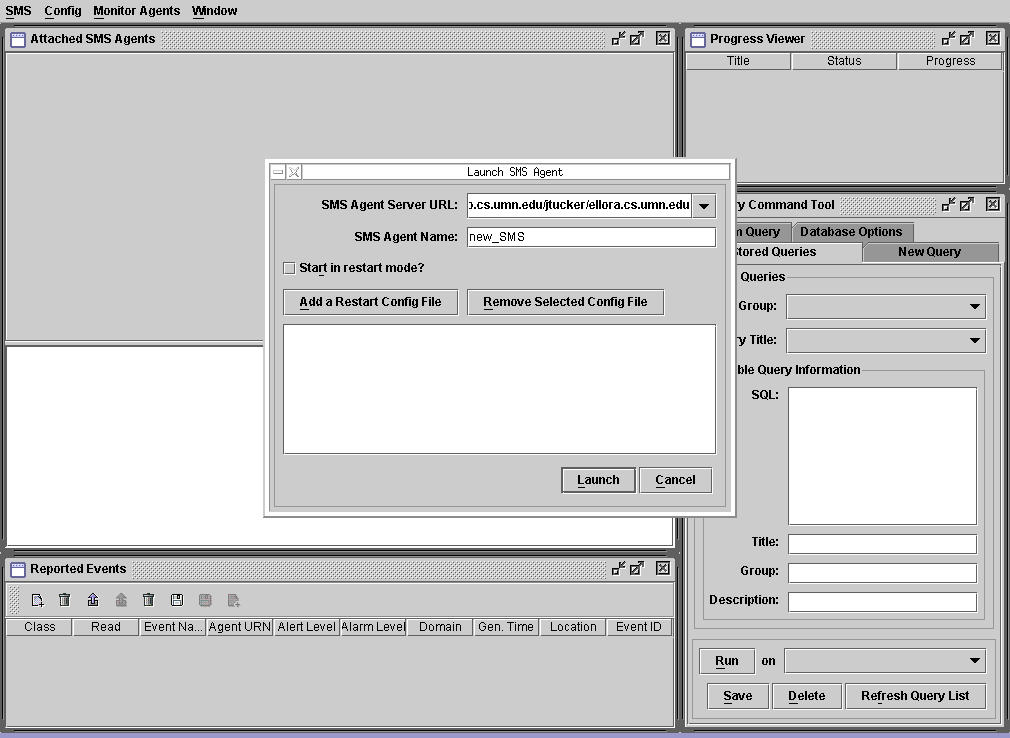
Set the SMS Agent Server URL then type in a name for the new SMS Agent and click Launch. The SMS Agent Server URL should be the URL given when you launched the SMS Agent Server.
Now go to the config menu and select Add Configuration.
This will bring up a another dialog. Select your configuration and type in a name.
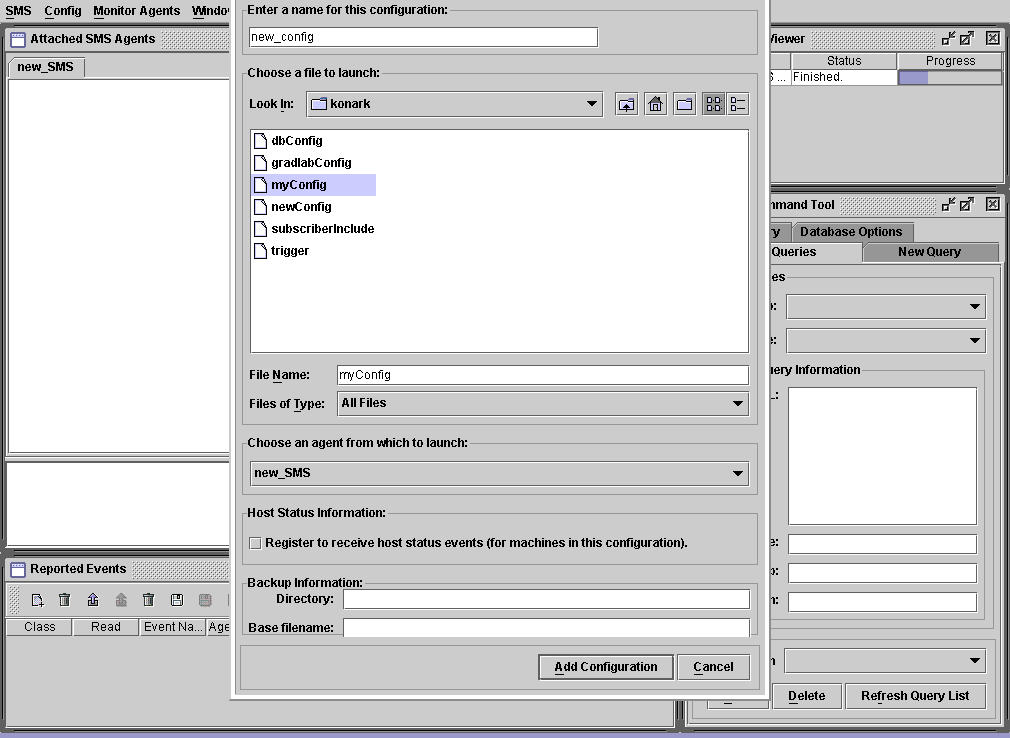
After you have completed this click Add Configuration.
There should be activity in your terminal windows now. The final state for the GUI at this
point will be:
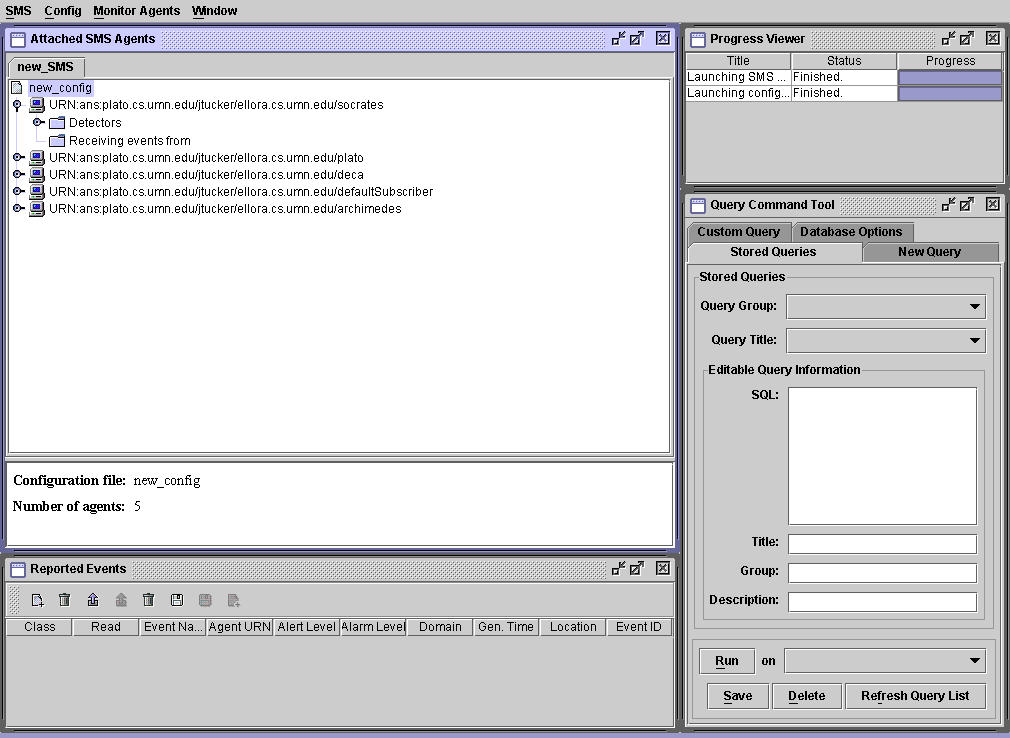
Double clicking on a the icons in the Attached SMS Agents window will bring up a list of sub icons.
If you wish you can detach the gui from the SMS Agent and reattach it to another. To do this go to "SMS" -> "Detach from SMS Agent". The system will run independently after detaching from the SMS Agent. Later you may restart the GUI and reattach it to the SMS Agent.
At this point you have a working network monitoring environment. The next section will introduce the console event viewer and what you need to do to start using it.
![]()
3.5 Console Event Viewer
The console event viewer is used to display events in the GUI. It is the window that looks like the following:
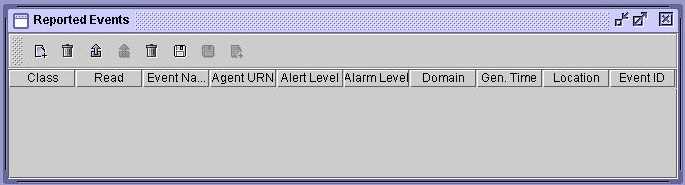
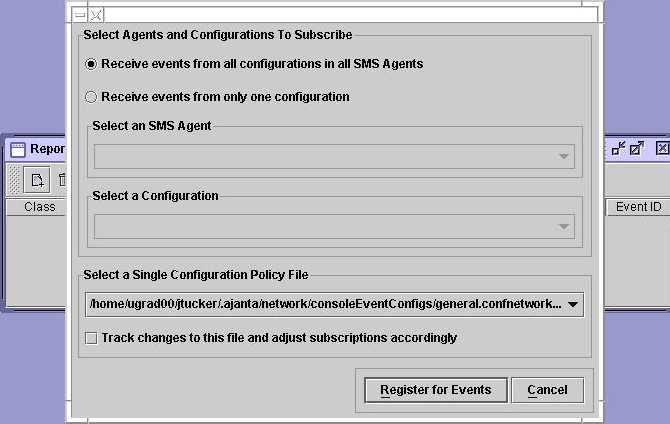
To turn on the console event viewer click on the far left icon (when the mouse is over the icon a window should pop up saying "Register a Config for Event Reporting"). This will bring up a window that lets you configure which configuration and what events you wish to have reported. For this example choose receive events from only one configuration. Select the SMS Agent and the configuration from the drop down lists. The single configuration policy file is discussed in section 2.3. After you have made your choices click on the Register for Events button. You may also select the "Track changes to this file and adjust subscriptions accordingly" check box. This allows you to dynamically change what events you will see in the console event viewer by modifying the configuration file.
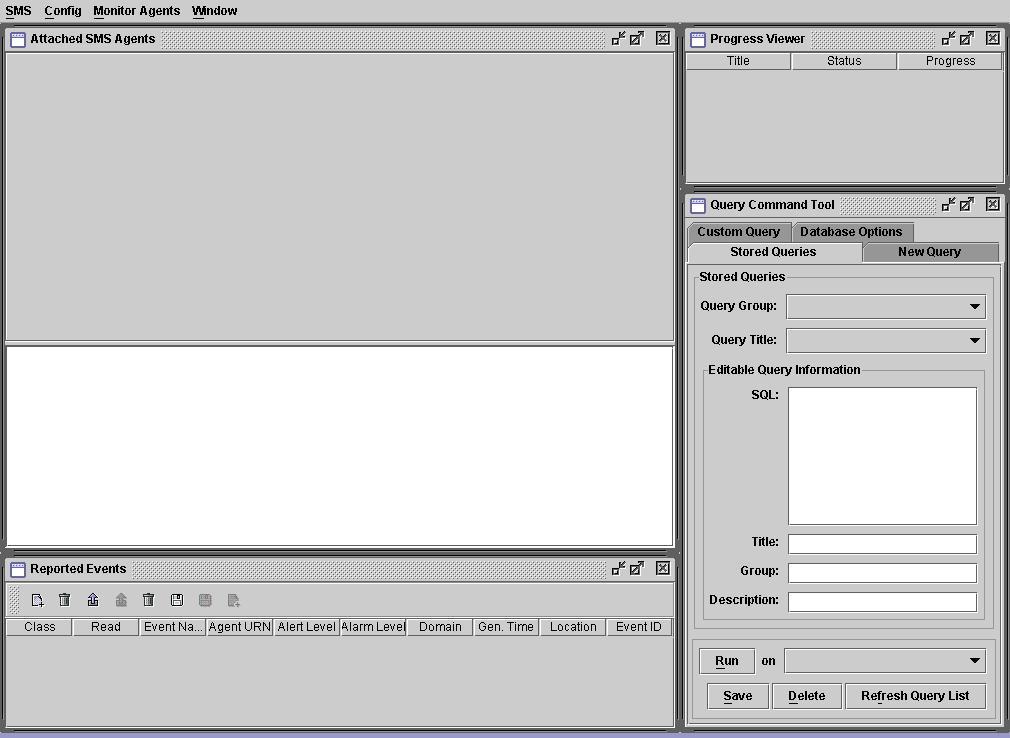
At this point you will begin to see events in the console event viewer. The functionality can be extended, however. Choose the Query command tool, it looks like this:
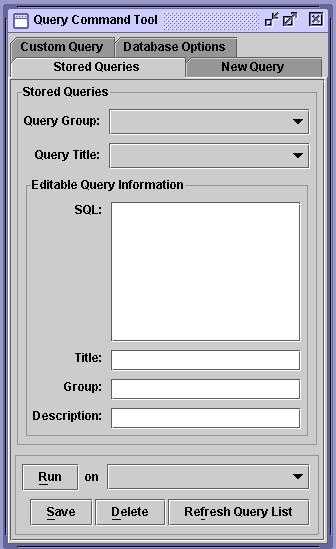
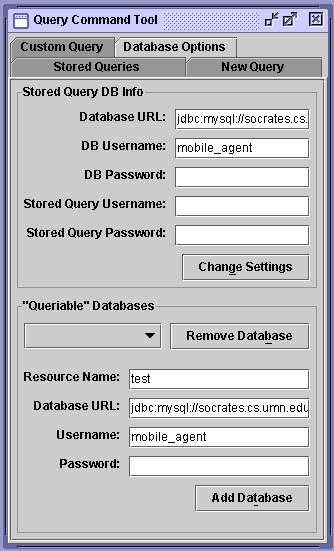
Click on the database options tab. The “Queriable” Database section will need to be changed. Enter the proper Resource Name (database name), Database URL (same as the one in the example configuration), the username, and the password. Then choose Add Database.
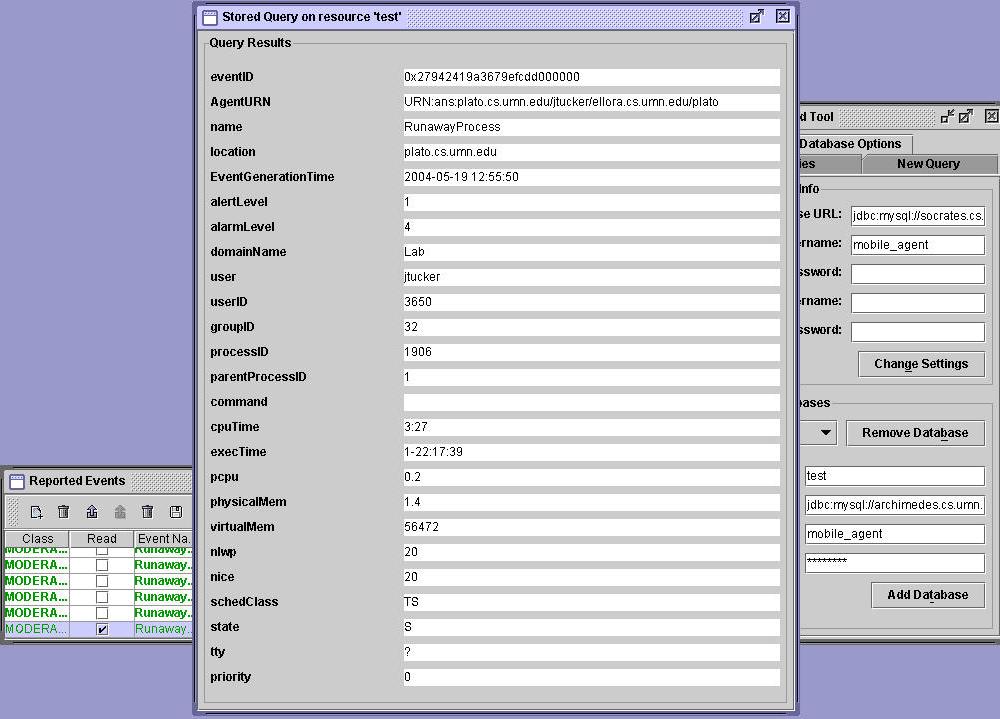
Now you can query the database based on the events given in the console event viewer. To do so right click on an event and choose Event Details. Then select the name of the database entered in the previous step. This will query the database based on the event you selected and give more information. An example of what to expect is below. The console event viewer and the query tool can be seen in the background. When the database is querried with an event from the console viewer a result similar to below will be seen.
![]()
![]()
![]()
![]()